EDCI 337 Justin Oliveros

Investigative and Comprehensive Blog Posts

Archives (page 2 of 2)

Design Principles & Choices – Principles for Effective and Accessible Multimedia

My Experience with Text-to-Speech Tools

I have experimented with various text-to-speech tools for my own personal pleasure; I found them particularly handy when exploring ways to read textbook chapters without losing concentration. Nonetheless, I acknowledge that the use of Text-to-speech tools opens up the learning and knowledge retention abilities to those outside of the classroom as well and can be used in various everyday tasks. The text-to-speech tools that I experimented with were both Google Chrome extensions: TTSReader and ReadAloud. 

ReadAloud provided a simple text-to-speech experience that was able to decode any article that I was reading with ease. 

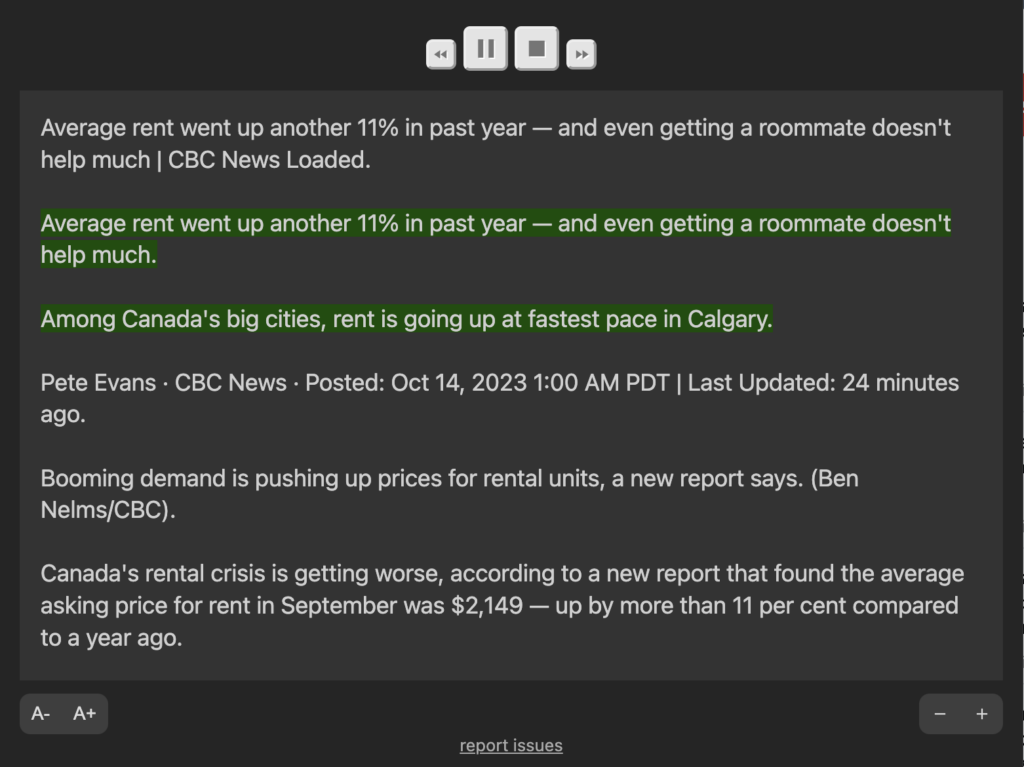
Figure 1. ReadAloud Chrome extension interface

TTSReader provided a comprehensive text-to-speech experience that allowed for more customization in favor of the user.

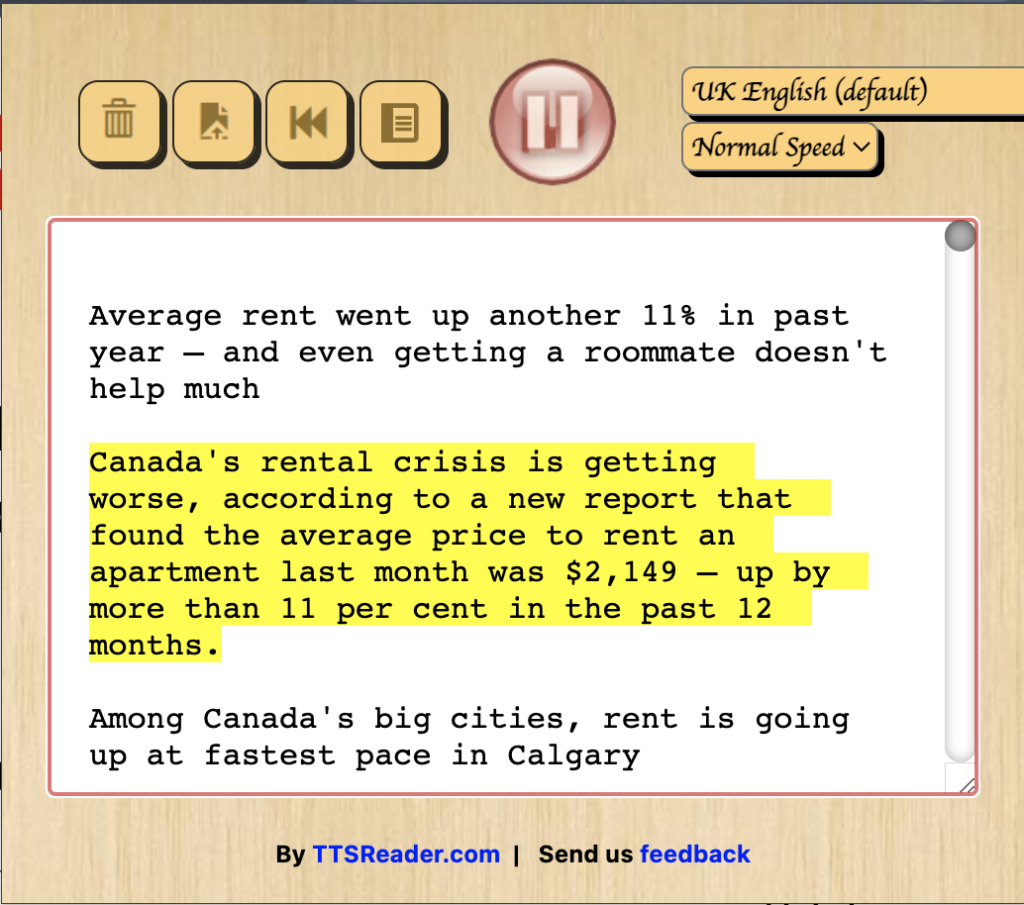
Figure 2. TTSReader Chrome extension interface

After trying both extensions, I found TTSReader to be the better extension due to the presence of features that work in favor of user experience. ReadAloud gives users the ability to play and pause the audio feed, enlarge the interface window, and enlarge word log font size. While these can be a sufficient amount of options that one may need when using one of these tools, TTSReader offers many more features that simply elevate the user experience. For example, TTSReader allows the user to change the accent of reader; including different voices and accents removes a potential language barrier that the user can have when interacting with the content and allows them to process the information as intended. I used the UK English voice for my playback as I found it soothing to listen to for longer periods of time; users will find it beneficial to alter the speaker accent to one that they will want to listen for long periods as it adds to the overall experience. Additionally, it also gives the user the ability to change the playback speed of the reader. As seen in Cognitive Load Theory, allowing the user to change the pace of their lessons removes intrinsic cognitive load and ensures proper processing of the right information. TTSReader also gave users the ability to restart the reading from the beginning, clear the text log, and pause/play as needed. 

Wave Accessibility Tool

The Wave accessibility tool highlighted errors and alerts that tend to be an afterthought when I put my blog posts and general text documents together. The first error that it spotted was the absence of alternative text with the featured image in my article. This tool smartly spotted that it was a practical design choice that I looked over. Alt text is important as it coincides with Mayer’s spatial contiguity principle and ensures that the text is supplemental information to message of the image. 

Figure 3. Wave Accessibility Checker highlighting the absence of alt text

The next error that was spotted was an not an absence, but rather, a presence of underlined text in each of the subheadings of my article. From an accessibility standpoint, this can be problematic as underlined text typically indicates hyperlinks or links to other websites, which strays from the true intent of the use of underlining which was differentiation from regular text.

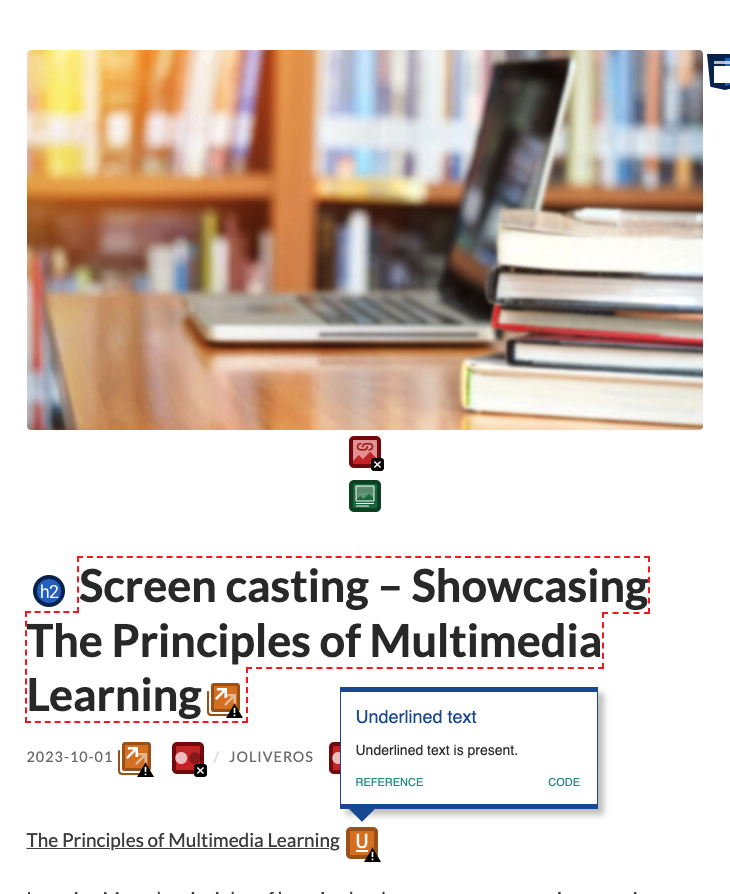
Figure 4. Wave Accessibility Checker highlighting the presence of underlined text

With any encountered errors, the tool goes on to explain the error, it’s significance, and how to correct it. To conclude, the Wave accessibility tool helps users correct any habitual accessibility errors to ensure the readers are gathering the proper information from the body of work.

Creating an Infographic with Canva

I used a template on Canva to create an infographic about Bloom’s Taxonomy that I learned in EDCI 339. Named after Benjamin Bloom, these six elements classify the different learning outcomes and skills for students. The ideas expressed in Bloom’s Taxonomy closely relate to those of Cognitive Load Theory in that we can use CLT to tailor our lessons so that students are learning effectively and efficiently, and Bloom’s Taxonomy outlines learning goals at each of its respective hierarchical levels throughout the lesson.

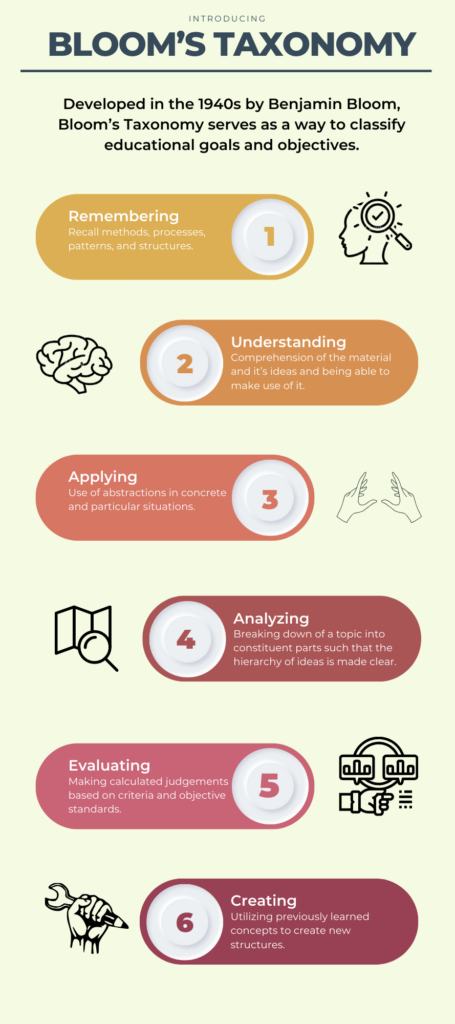
Figure 5. Canva Infographic about Bloom’s Taxonomy

The practical design principles that I focused on were:

  1. Alignment – the six elements are displayed in a logical manner and ensure a clean viewing experience. The reader is able to interpret each symbol as supplementary as they align with their of their respective elements beside them. 
  2. Repetition – the same structure, i.e. coloured oval, inner circles, and number, follow for each of the six elements. This repetition lets the reader draw patterns between the content and know which ideas are correlated to one another. 
  3. Hierarchy – the elements are presented in descending order according to the way that each learning outcome unfolds in the lesson. This ensures the reader traverses through the steps in the proper order laid out for them when creating learning outcomes.
  4. Color – the same warm color palette is used for the elements in descending order to show a pattern between ideas. The colours become warmer as you traverse the graphic and learn more about the topic. I chose the warm color palette since it evokes a passionate and uplifting emotion to the lesson.
  5. Simple Imagery – these simple but visually intuitive images beside each of the elements demonstrate the type of action being performed. It gives the reader an immediate grasp of the information displayed if they are unable to interpret it verbally.

Screen casting – Showcasing The Principles of Multimedia Learning

The Principles of Multimedia Learning

Learning Mayer’s principles of learning has been a very eye-opening experience. Each principle contributes to the learner being able obtain and retain information in it’s own unique way. Furthermore, how each of the principles fit into the broader Cognitive Load categories sheds light on how to properly construct new lessons and teaching experiences for learners. As I read about the different principles, I reflect on the different lessons infused with those principles that I have learned in the past. 

Reflection Question: Provide an example of a multimedia learning principle that you have intuitively followed in the past, and an example of a multimedia learning principle that you have not followed in the past. What will you do differently now?

One of Mayer’s principles of Multimedia Learning that I intuitively follow is the spatial contiguity principle – keeping words and pictures close to each other. In many of the PowerPoints that I have created and in my mini course that I created for another Curriculum and Instruction course, I sought to include a couple of strategically positioned visuals and symbols to supplement the information provided through text on slides when appropriate. I find that visuals next to words allows learners to draw on the relationships between them and the surrounding content more seamlessly and reduces the chance of them misinterpreting the content. It creates a natural flow between the ideas and requires the learner to use less energy to make any meaning from it. 

Conversely, one of the learning principles that I have disregarded in the past is pretraining. While presenting diagrams and images can help ideas together, learners can still be inundated with the amount of information that they must absorb at once. Pretraining remedies this by priming students to learn more complex ideas once they have first learned the key concepts and definitions first. For my part, I will begin applying the pretraining principle by presenting all the necessary tools and definitions before exploring how we will use them. If necessary, I will include them in an entire introductory section to explain this information if I see that it may be beneficial to learners.

Screen casting showcase: Grammarly

In my screencast I decided to showcase Grammarly: an online writing tool to help you write letters and documents that convey the proper meaning that you want them to. This is accomplished by giving you spelling and grammar aid, word and tone substitutions, and a customizable to audience slider to tweak your suggestions to the audience of your document. 

As for preparation, I have done a screencast using Zoom before so capturing the audio and video and exporting to another device was not too hard for me. Moreover, the body of the presentation was largely unscripted with the exception of the introduction. I felt that this approach allowed me to be conversational in the way I talked; I was able to naturally guide the learner through the process of the interface and using the service instead of speaking off of a premade script in a machinelike way. In this way, I am also demonstrating the personalization principle. In my future screencasts, I will focus on the segmenting principle and look for ways to break down the content into smaller chunks that build on each other even if it will result in a longer video. 

Featured image: Wiley University Services. “Principles of Multimedia Learning”. https://ctl.wiley.com/principles-of-multimedia-learning/

WordPress Blog Introduction – Justin Oliveros

Hello there! My name is Justin Oliveros and I am a third year Computer Science student at the University of Victoria. In my spare time, I enjoy playing guitar, building games, shooting hoops, and exploring the outdoors. I spent this past summer travelling and camping around the West Coast and I loved every second of it!

I am interested in learning about the use of multimedia to diversify our teachings of various subjects and experiences. For instance, how to utilize multimedia to deepen our understanding of the possibilities of artificial intelligence in our everyday lives. The rise of artificial intelligence has been felt across multiple industries and fields, and using multimedia to explain how we can utilize it can reaffirm people’s optimism and ease any tensions regarding the subject.

I am also intrigued to learn how the different forms of multimedia can help students with impairments learn as effectively and comfortably as others.

Welcome and Introduction

Before proceeding with this first blog post, we expect you to consider your privacy preferences carefully and that you have considered the following options:

  1. Do you want to be online vs. offline?
  2. Do you want to use your name (or part thereof) vs. a pseudonym (e.g., West Coast Teacher)?
  3. Do you want to have your blog public vs. private? (Note, you can set individual blog posts private or password protected or have an entire blog set to private)
  4. Have you considered whether you are posting within or outside of Canada? This blog on opened.ca is hosted within Canada. That said, any public blog posts can have its content aggregated/curated onto social networks outside of Canada.

First tasks you might explore with your new blog:

  • Go into its admin panel found by adding /wp-admin at the end of your blogā€™s URL
  • Add new category or tags to organize your blog posts ā€“ found under ā€œPostsā€ (but do not remove the pre-existing categories or sub-categories).Ā  If you would like to add more course categories, please do so (e.g., add EDCI 306A with no space for Music Ed, etc.)
  • See if your blog posts are appearing on the course website (you must have the course categories assigned to a post first and have provided your instructor with your blog URL)
  • Add pages
  • Embed images or set featured images and embed video in blog posts and pages (can be your own media or that found on the internet, but consider free or creative commons licensed works)
  • Under Appearance,
    • Select your preferred website theme and customize to your preferences (New title, etc.)
    • Customize menus & navigation
    • Use widgets to customize blog content and features
  • Delete this starter post (or switch it to draft status if you want to keep for reference)

Do consider creating categories for each course that you take should you wish to document your learning (or from professional learning activities outside of formal courses). Keep note, however, that you may wish to use the course topic as the category as opposed to the course number as those outside of your program would not be familiar with the number (e.g., we use ā€œMultimedia Learningā€ instead of ā€œedci337).

Lastly, as always, be aware of theĀ FIPPAĀ as it relates to privacy and share only those names/images that you have consent to use or are otherwise public figures. When in doubt, ask us.